Saturday, February 28, 2015

A Butterfly Birthday

One of the things I love about stamping is the ability to customize.  When it comes to birthdays, I try to make my card match the gift bag or paper that I'm using.  Today I have a set that I made for a birthday last week that turned out amazing.


Doesn't the card look like it came with the bag!!  I was so tickled when hubby found this gorgeous bag because I knew immediately what to do for a matching card.


The Butterfly Basics Bundle matched the theme of the bag beautifully.  I used Basic Black and Very Vanilla along with the Typeset Designer Series Paper.  The card was very simple to make since it's just one color of ink, Memento Tuxedo Black.


I stamped off to make the leaves in the center of the card a bit lighter and more vintage looking.  It also helps the sentiment stand out better, especially since it overlaps a little.  A strip of the beautiful Typeset Designer Paper adds to the vintage feel and creates balance.  I used a little bit of retired taffeta ribbon, it adds that little extra something that was needed.


The butterfly was the icing on the cake.  I used Basic Black with a couple of small pearls and added it over the leaves.


In the end, I was super pleased with how this gift set turned out.  I hope you give the Butterfly Basics Bundle a try, it's so amazing!


Thanks so much for stopping by!  Happy Stamping!


Built for Free Using: My Stampin Blog


Print Friendly and PDF

Follow my blog with Bloglovin


A Butterfly Birthday

One of the things I love about stamping is the ability to customize.  When it comes to birthdays, I try to make my card match the gift bag or paper that I'm using.  Today I have a set that I made for a birthday last week that turned out amazing.

Doesn't the card look like it came with the bag!!  I was so tickled when hubby found this gorgeous bag because I knew immediately what to do for a matching card.

The Butterfly Basics Bundle matched the theme of the bag beautifully.  I used Basic Black and Very Vanilla along with the Typeset Designer Series Paper.  The card was very simple to make since it's just one color of ink, Memento Tuxedo Black.

I stamped off to make the leaves in the center of the card a bit lighter and more vintage looking.  It also helps the sentiment stand out better, especially since it overlaps a little.  A strip of the beautiful Typeset Designer Paper adds to the vintage feel and creates balance.  I used a little bit of retired taffeta ribbon, it adds that little extra something that was needed.

The butterfly was the icing on the cake.  I used Basic Black with a couple of small pearls and added it over the leaves.

In the end, I was super pleased with how this gift set turned out.  I hope you give the Butterfly Basics Bundle a try, it's so amazing!

Thanks so much for stopping by!  Happy Stamping!
Built for Free Using: My Stampin Blog

Print Friendly and PDF

Follow my blog with Bloglovin


Thursday, February 26, 2015

A Wedding Card for CCMC344

It's Thursday and time for a new challenge from Create with Connie and Mary.  This week we have a beautiful color combination of Blackberry Bliss, Rose Red and Blushing Bride.


I decided to go with a bit of an ombre' look with these colors and the awesome Irresistibly Yours Designer Series Paper from the Sale-a-bration Catalog.


I used Blackberry Bliss for the card base since it's such a striking color.  Then I simply added the leaf design that I created by sponging on the three colors.  I started out with Blushing Bride at the top then added in Rose Red to the center and Blackberry Bliss at the bottom.  I love the soft look of the colors together.


I kept the rest of the card simple since I want the background paper to really stand out.  The sentiment and vine wreath come from Your Perfect Day on page 44 in the Occasions Catalog.  I stamped the wreath with Blackberry Bliss on Whisper White.  I stamped over it again without re-inking to create a lighter image and make the wreath look fuller.  I made sure to change the position of the stamp slightly to make the leaves stamp in a new position.  Next, I stamped the sentiment in the center and die cut the whole thing with a Circle Framelit.  Small hearts made from the Heart Border Punch and Rose Red cardstock go around the wreath to bring in some color.  Last little tidbit is a small flower from the Itty Bitty Accents Punch Pack.  It's done with Blushing Bride cardstock and given a bit of dimension by curling up the petals with a stylus and Stampin' Pierce Mat.   A tiny pearl in the center finishes off the flower and the card.


So, now it's your turn to give these beautiful colors a try and join the challenge with us!  Just go to Create with Connie and Mary for all the details plus more great samples from the Design Team.


Thanks so much for visiting!! Happy Stamping!


Print Friendly and PDF

Follow my blog with Bloglovin


A Wedding Card for CCMC344

It's Thursday and time for a new challenge from Create with Connie and Mary.  This week we have a beautiful color combination of Blackberry Bliss, Rose Red and Blushing Bride.


I decided to go with a bit of an ombre' look with these colors and the awesome Irresistibly Yours Designer Series Paper from the Sale-a-bration Catalog.

I used Blackberry Bliss for the card base since it's such a striking color.  Then I simply added the leaf design that I created by sponging on the three colors.  I started out with Blushing Bride at the top then added in Rose Red to the center and Blackberry Bliss at the bottom.  I love the soft look of the colors together.

I kept the rest of the card simple since I want the background paper to really stand out.  The sentiment and vine wreath come from Your Perfect Day on page 44 in the Occasions Catalog.  I stamped the wreath with Blackberry Bliss on Whisper White.  I stamped over it again without re-inking to create a lighter image and make the wreath look fuller.  I made sure to change the position of the stamp slightly to make the leaves stamp in a new position.  Next, I stamped the sentiment in the center and die cut the whole thing with a Circle Framelit.  Small hearts made from the Heart Border Punch and Rose Red cardstock go around the wreath to bring in some color.  Last little tidbit is a small flower from the Itty Bitty Accents Punch Pack.  It's done with Blushing Bride cardstock and given a bit of dimension by curling up the petals with a stylus and Stampin' Pierce Mat.   A tiny pearl in the center finishes off the flower and the card.

So, now it's your turn to give these beautiful colors a try and join the challenge with us!  Just go to Create with Connie and Mary for all the details plus more great samples from the Design Team.

Thanks so much for visiting!! Happy Stamping!


Print Friendly and PDF

Follow my blog with Bloglovin


Tuesday, February 24, 2015

Adventure Bound Birthday

I have a really quick masculine card to share with you today.  I needed one I could make quickly, so I turned to the Adventure Bound Designer Series Paper Stack.  I pulled out one of the beautiful realistic scenes and added a simple sentiment.


Isn't this great!  It's simple yet beautiful and perfect for a man!  The best part is it only required a few minutes and a couple of supplies to make.


I started with a Garden Green card base and added the forest paper from the Adventure Bound DSP Stack.  Along the bottom is a simple birthday sentiment using the Crazy About You Bundle.  I die cut "happy" in Garden Green and adhered it with the 2-Way Glue Pen.  Underneath is a banner from Garden Green with "birthday" stamped in Garden Green.  I added it with a couple of dimensionals.  And that's it!!  Super simple yet super manly for a guy in your life!

I also have some weekly deals to share, they are good through Monday of next week.  You can place an order online, just click on one of these items in the left column at the top of the page, it will take you directly to the store!


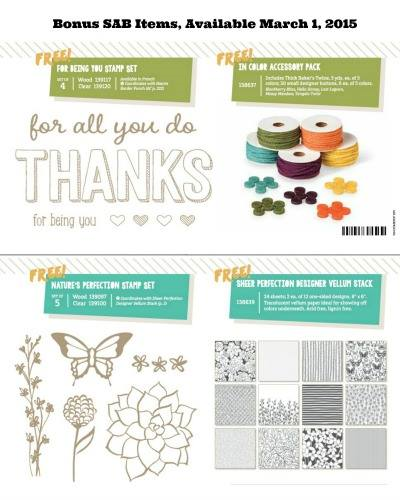
We also have 4....YES 4 new Sale-a-bration FREEBIES that will start on March 1st!!  There is new paper, stamps and accessories...how cool is that!!  Click on the image to see the PDF File of the products.  Sale-a-brations continues through the end of March, earn a FREE item for every $50 in product purchased.


http://www.stampinup.com/us/documents/Flyer_SAB2_demo_Feb1715_US.pdf


Thanks so much for visiting today!!  Happy Stamping!


Print Friendly and PDF

Follow my blog with Bloglovin

Adventure Bound Birthday

I have a really quick masculine card to share with you today.  I needed one I could make quickly, so I turned to the Adventure Bound Designer Series Paper Stack.  I pulled out one of the beautiful realistic scenes and added a simple sentiment.

Isn't this great!  It's simple yet beautiful and perfect for a man!  The best part is it only required a few minutes and a couple of supplies to make.

I started with a Garden Green card base and added the forest paper from the Adventure Bound DSP Stack.  Along the bottom is a simple birthday sentiment using the Crazy About You Bundle.  I die cut "happy" in Garden Green and adhered it with the 2-Way Glue Pen.  Underneath is a banner from Garden Green with "birthday" stamped in Garden Green.  I added it with a couple of dimensionals.  And that's it!!  Super simple yet super manly for a guy in your life!

I also have some weekly deals to share, they are good through Monday of next week.  You can place an order online, just click on one of these items in the left column at the top of the page, it will take you directly to the store!


We also have 4....YES 4 new Sale-a-bration FREEBIES that will start on March 1st!!  There is new paper, stamps and accessories...how cool is that!!  Click on the image to see the PDF File of the products.  Sale-a-brations continues through the end of March, earn a FREE item for every $50 in product purchased.

http://www.stampinup.com/us/documents/Flyer_SAB2_demo_Feb1715_US.pdf

Thanks so much for visiting today!!  Happy Stamping!


Print Friendly and PDF

Follow my blog with Bloglovin


Monday, February 23, 2015

Love is Kindness for TSSC355

Happy Monday!  I have a card to share today for the Monday Lunchtime Sketch Challenge.  Mary Jo has a great sketch for us as usual.  I hope you will join the challenge with us!  Also, please stop by to say Happy Birthday to Mary Jo, she turned 50 today!


I pondered this one a little, I didn't know if I wanted to do the same tag shape or something a little different.  I ended up using something different so I could use the really beautiful stamp Love is Kindness.


At first glance through the catalog I didn't really pay much attention to this stamp.  BUT....I started seeing all of the gorgeous cards that were being made so of course I had to get it!   I can now say if you don't have it, GET IT!  I had such a great time designing and coloring this card.  The image is perfect for the blendabilities and is full proof...you can't mess it up!


Here's the scoop on the design:

-Coastal Cabana card base, Gorgeous Grunge speckles  stamped all over in Coastal Cabana
-Strip of Typeset DSP along the left side
-Strip of Blushing Bride along the center, embossed with Happy Heart EF
-Strip of striped design washi tape from Stacked with Love Washi, added along bottom edge of Blushing Bride cardstock
 -Floral mage stamped on Very Vanilla cut from Apothecary Accents Framelit
-Image colored with blendabilities: Pink Pirouette, Wild Wasabi plus Soft Sky for outline
-Sentiment from Crazy About You added with a dimensional
-A few Bermuda Bay sequins scattered around

Once I knew where I was going with this one, it went really quick.  The coloring was fast since the image isn't too big.  One tip for you, I separated the sentiment from the flowers when I was putting my stamp together.  I simply put the sentiment on a small wood block of it's own.  It makes the stamp more versatile, I can use it without the sentiment very easily or add it in if I want.

OK....your turn now!  Just go to Techno Stamper for all the details plus more great samples from the Design Team.


Mary Jo Price- Williams:  Technostamper 


Sue Root:  Stampin' With Sue2


Robbie Rubula: InkedX2 


Tanya Bell: Stamping T! 


Carolyn Bennett: Carolyn's Paper Fantasies 


Jonia Smith: Stampin for Me 

Mary Brown: Stamper Camper


Thanks for stopping by!  Happy Stamping!


Print Friendly and PDF

Follow my blog with Bloglovin


Love is Kindness for TSSC355

Happy Monday!  I have a card to share today for the Monday Lunchtime Sketch Challenge.  Mary Jo has a great sketch for us as usual.  I hope you will join the challenge with us!  Also, please stop by to say Happy Birthday to Mary Jo, she turned 50 today!


I pondered this one a little, I didn't know if I wanted to do the same tag shape or something a little different.  I ended up using something different so I could use the really beautiful stamp Love is Kindness.

At first glance through the catalog I didn't really pay much attention to this stamp.  BUT....I started seeing all of the gorgeous cards that were being made so of course I had to get it!   I can now say if you don't have it, GET IT!  I had such a great time designing and coloring this card.  The image is perfect for the blendabilities and is full proof...you can't mess it up!

Here's the scoop on the design:

-Coastal Cabana card base, Gorgeous Grunge speckles  stamped all over in Coastal Cabana
-Strip of Typeset DSP along the left side
-Strip of Blushing Bride along the center, embossed with Happy Heart EF
-Strip of striped design washi tape from Stacked with Love Washi, added along bottom edge of Blushing Bride cardstock
 -Floral mage stamped on Very Vanilla cut from Apothecary Accents Framelit
-Image colored with blendabilities: Pink Pirouette, Wild Wasabi plus Soft Sky for outline
-Sentiment from Crazy About You added with a dimensional
-A few Bermuda Bay sequins scattered around

Once I knew where I was going with this one, it went really quick.  The coloring was fast since the image isn't too big.  One tip for you, I separated the sentiment from the flowers when I was putting my stamp together.  I simply put the sentiment on a small wood block of it's own.  It makes the stamp more versatile, I can use it without the sentiment very easily or add it in if I want.

OK....your turn now!  Just go to Techno Stamper for all the details plus more great samples from the Design Team.

Mary Jo Price- Williams:  Technostamper 
Sue Root:  Stampin' With Sue2
Robbie Rubula: InkedX2 
Eileen LeFevre: Eileen's Stampin' Fever Blog 
Tanya Bell: Stamping T! 
Carolyn Bennett: Carolyn's Paper Fantasies 
Jonia Smith: Stampin for Me 
Mary Brown: Stamper Camper

Thanks for stopping by!  Happy Stamping!

Print Friendly and PDF

Follow my blog with Bloglovin


Thursday, February 19, 2015

You Rock!

It's Thursday and I have a fun card for this week's sketch challenge from Create with Connie and Mary.  They have a great clean and simple sketch this week, take a look.


It didn't take long for me to figure out what I wanted to do with this one.  I have been wanting to use a specific design from the Adventure Bound Designer Series Paper Stack and it was the perfect opportunity.


Isn't this fun!  I saw a 3x3 card awhile back on Pinterest that had this paper and "you rock" and thought it was too stinkin' cute!  When I saw the sketch this week I knew this was the perfect design for this idea.


This would be such a great card for a guy.  Best part is how quickly it can be thrown together, especially if you need a card last minute.

The card base is Smokey Slate with a layer of the rock design from Adventure Bound paper cut at an angle.  I added a strip of another design from the same set of paper to compliment the colors and give a nice clean finish to the card.


The sentiment was just as simple thanks to the photopolymer set Skinny Mini Alphabet.  I was able to stamp the words exactly where I wanted them and it turned out great on the first try!


Now it's your turn!  I hope you will join the challenge with me and create a card of your own.  Just go to Create with Connie and Mary for all the details plus more great samples from the Design Team.


Thanks so much for visiting!! Happy Stamping!!


Print Friendly and PDF

Follow my blog with Bloglovin